10 August 2009

Awesome digital bokeh effect in Photoshop

Our last Wallpaper of the Week was an image I had created using Pixelmator, and I really liked the outcome. The best part about it was that it was pretty easy to accomplish in Pixelmator, but I decided for perspective's sake to create the same effect in Photoshop. The process is easy as well, but with a few extra steps.

As in the previous tutorial, I will show you how to create a digital bokeh effect, but this time in Photoshop. The process is very easy and we will be using the super powerful Brush Engine, one of the coolest things in Photoshop.

Step 1

Create a new document in Photoshop. As usual I will use a nice scree resolution,1920x1200 pixels. Fill the background layer with a very dark grey, not black. If you fill it with black the effect won't work. The color I used was #262626.

Digital Bokeh in Photoshop

Step 2

Select the Ellipse Tool (U), and create a circle. Use black for the color, and go toLayer>Layer Style>Blending Options. Change the Fill Opacity to 50%. After that selectStroke. Use 10 pixels for the size, Inside for the Position and Black for the color.

Digital Bokeh in Photoshop

Step 3

Select the ellipse and go to Edit>Define Brush. Name your brush and that's done. Now we have a new brush ;)

Digital Bokeh in Photoshop

Step 4

Go to Window>Brushes (F5). The first thing to do in the Brush Engine is to select our new Brush. The size won't matter because you will change that when you use it. TheSpacing, however, is very important. Chage the value to 100%. After that, select theShape Dynamics, then Scattering and Other dynamics. For the values use the image below.

Digital Bokeh in Photoshop

Step 5

Before we start painting our bokehs let's create a new layer and fill it with a colorful gradient. I created a new layer and used the layer styles to do that but feel free to do the way you are used to. My gradient settings are as follows: Blend Mode is Overlay, Opacity is 100%, Style is Linear, and the Angle is 45ยบ. The colors I used are: Yellow (#00085), Cyan (#1bdaeb), Purple (#9b3b81), Orange (#d27e34).

Digital Bokeh in Photoshop

Step 6

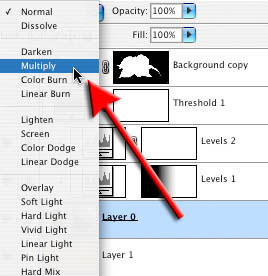
Let's create a new Folder in our Layer Palette. Rename the folder to Bokehs and change the Blend Mode to Color Dodge. Then create a new layer, choose white for the color and select the Brush Tool (B). Now just paint some ellipses with our custom brush. For this first layer use a big size, like 500-600px.

Digital Bokeh in Photoshop

Step 7

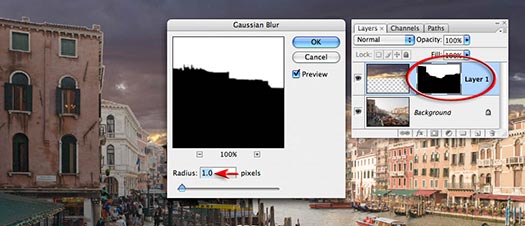
Go to Filter>Blur>Gaussian Blur. For this first layer use 20 pixels for the Radius.

Digital Bokeh in Photoshop

Step 8

Create another layer and paint more brushes. This time however use a smaller size for the brush. After that go to Filter>Blur>Gaussian Blur. Use 4 pixels for the Radius.

Digital Bokeh in Photoshop

Step 9

Create another layer and repeat the previous step, this time however use a much smaller brush. Apply the Gaussian Blur to this layer as well, but use only 1 pixel for the Radius.

Digital Bokeh in Photoshop

Conclusion

Now just add your logo and that's it. We have a nice wallpaper. The idea of this tutorial was once again to show the power of the Brush Engine. You can try different shapes for this same effect, like hexagons for example. Also you can play a bit with the blurs to add more depth to the final design. Now it's up to you.

Digital Bokeh in Photoshop
Click on the image for a full preview

Movie Poster look SinCity

Make a Planet

This tutorial should step you through making a simple, yet realistic-looking planet using Adobe Photoshop 7, and ONLY Adobe Photoshop 7. We're working small here, so keep in mind that the larger you work, the harder the planet will be to create (just a bit more work as size increases).

To complete this tutorial and match what I'm showing you in the sample images, you'll need this image for a texture, so save it in a safe spot, we'll get to it in a moment.

A thank you to Kyle Nervik of
Bougal.com, who helped me figure out how to best relate my methods to a general audience by being my development guinea pig (sitting on AIM for over an hour, listening to me argue with myself, and offering suggestions). Thanks, Kyle!

Start with a plain black image, 500x500 pixels. Make a new layer and, using the circle marquee select a circle about 2/3 the size of the root image.

Fill it black, and leave the marquee active (do not deselect).

Grab the Airbrush Soft Round 300 (we need a big, fuzzy brush).

Set the opacity of the brush to30% and the mode to Linear Dodge.

We're going to pretend our light source is coming from the upper left (this is arbitrary).

Start brushing color (we'll use hexadecimal value 664029) from about 8 o'clock to 2 o'clock, working towards the upper left corner. You want the result to look like the image to the left of this text. Basically, we've just established the main "sphere" of our planet.

Alrighty, time to grab that planet texture I had youdownload. Open it up and go to Edit > Define Pattern. Name it whatever you want.

This done, grab your trustybrush tool again (same exact settings as before, and go up to the brushes tab at the top of your screen in Adobe PS. You need to set the texture of your brush to the planet texture for the next step. The window for the brush settings looks like so...

Select the pattern we just made from the menu of available patterns.

Repeat the brush motions that we used to define our basic sphere, only this time we're adiding texture to the planet. Again, brush from 8 to 2 o'clock only, leave the dark area dark, as it's the shadow on our planet. The result should look like so...

(we've still got our marquee selecting the circle of our planet... don't deselect the planet quite yet).

Now we're going to help our sphere a little via Photoshop's sphereize filter.

Go to Filter > Distort > Sphereize, set it to 100%, and click OK. Just for good measure, repeat this action for an additional 50%.

Once that's done,
cut your planet from the layer it is wth the Edit > Cut command
(or ctrl - x if you're shortcut savvy).

Paste it into a new transparent layer and delete the old layer. This gets rid of some annoying pixel-y artifacts around the rim of the planet, leaving you with a nice, smooth edge to work with (because real planets don't have pixels!).

This is now our "planet" layer. It would be a good idea to rename it as such so you know what you've got.

Next we'll add some atmosphere.

Duplicate your planet layer, and then go to
Layer > Layer Style > Blending Options
.
You can also get to the resulting window
via right-clicking on the layer in the layer palette
and selecting Blending Options.

Change the Blend Mode to Linear Dodge, and the Fill Opacity to 0% (as shown)
Add an outer glow as shown... for the purposes of this tutorial, we'll use hexadecimal color value of 6283A7 for the glow color.
Add an inner glow as shown... again, we'll use hexadecimal color value of 6283A7 for the glow color, because the two glows need to match, or they'll look really silly where they meet at the planet outline.

Your planet should look something like this now. Not too shabby, but we've got way too much atmosphere on our planet.

Create a new layer on top of your second planet layer. Link this layer to the top planet layer (the one with all the effects), and then merge the two together. This will make your effects just a layer instead of actual effects... so you'll now have a layer with just your blue ring of atmosphere in it. Youll need to set the layer mode of the atmosphere layer to Linear Dodge again to make it match the image once more. This is now our "atmosphere" layer. Again, it is a good idea to rename it as such so you know what you've got.

Next we'll grab the eraser tool... Same brush size as the one we used to set our original sphere (Airbrush Soft Round 300 or sme equivalent big fuzzy brush).

Gently erase between 6 and 3 o'clock on your atmosphere layer. You should get a result like this... (the white circle is the brush erasing).

We're looking pretty good right now, but we're not done yet.

Let's be nitpicky and add a tiny bit of embossing to the planet to really make it pop. Right now you should still have three layers total... atmosphere on top of planet on top of black background. Duplicate the planet layer.

Go to Filter > Stylize > Emboss and emboss the sucker at anAngle of about -33 degrees,Height of 1 and Amount of 500%.

This done,
desaturate (ctrl - shift - u) the embossed layer and duplicate it again so you have two of the suckers.

We need to isolate the light and dark elements of the embossed layers, because we'll play with both seperately (hence the two layers.)

Use levels on the topmost one to isolate the lights by increasing the darkness until the main part of the layer is black with just a few white squiggles. This is now our "highlights" layer. You might want to rename it as such.

Repeat this with the lower embossed layer, only this time pull the lightness up so you've got all white with black squiggles. This is now our "shadows" layer. Again, it might be a good idea to rename it as such.

Change the black embossed layer mode to Linear Dodge, and the white embossed layer mode to Multiply. You'll notice a strong white outline in the shadow of our planet... use your big fuzzy eraser brush to erase it like you did the extra atmosphere we had earlier.

At this point, you're just about done. Our embossing is a little blatant, however. Planetary details need to be subtle to work with the right sense of scale, so make our "highlights" layer about 50% opaque. The "shadows" layer should be good at about 70% opacity.

I personally like a good amount of contrast, so I toyed slightly with curves (ctrl - m) to make the planet a little more vibrant. This is optional... you've now got a finished planet!

Working With Shadows In Photoshop - Advanced Shadow Techniques

Learn the fine art of isolating and preserving delicate and complex shadows for transplantation to exotic new backgrounds. Mark Galer reveals how to introduce a world of exciting textures to your ever so subtle... not... studio tabletop.

Working With Shadows In Photoshop - Advanced Shadow Techniques

Desert Camelia

Working With Shadows In Photoshop - Advanced Shadow Techniques

Working With Shadows In Photoshop - Advanced Shadow Techniques

Humble beginnings – take one flower, a desk lamp and some white paper.

The flower for this tutorial was photographed (using a Fuji FinePix) on a cold winters morning in Victoria whilst the sand (shot on Kodachrome film) hails from the Great Indian Desert in Rajasthan. Unlikely bedfellows, but with a little craft the two can lie together comfortably within the same frame – but only if the subtle shadow (created by a not-so-subtle 75 watt globe and a couple of pieces of white paper) is captured with all of its subtlety and delicately transplanted to its new home in the desert. This is how...!

Botanical Health Warning: The delicate petals of the flower can be cooked, frazzled or fried by the heat of a tungsten lamp in just a few minutes. Be prepared to work quickly or use soft window light as a low-temperature alternative.

Working With Shadows In Photoshop - Advanced Shadow Techniques

Duplicate the background layer.

Step 1
Duplicate the background layer by dragging the layer to the ‘New Layer’ icon in the layers palette. Don’t worry if the edges of your white paper are in the frame. Just be sure to capture the subject and its shadow.

Note: The surface used does not have to be white, but should be relatively texture-free. This will avoid mismatched textures when the shadow is transported to its new home.

Working With Shadows In Photoshop - Advanced Shadow Techniques

Use the gradient tool in Quick Mask mode.

Step 2
The initial steps in this tutorial aim to reduce the background tone to white and leave the shadows intact. The fall-off of light from the directional light source (the white background gradually becoming grey on the side furthest from the light) can be balanced using an adjustment layer. Select the ‘Default Foreground and Background Colors’, ‘Quick Mask Mode’ and the ‘Gradient Tool’ in the ‘Tools Palette’. Select the ‘Linear Gradient’ and the ‘Foreground to Transparent’, or ‘Foreground to Background’ option in the ‘Options’ bar. Drag a gradient from the brighter side of the image to the darker side of the image. A gradient in the default masking color will appear. Exit Quick Mask mode to reveal the resulting selection.

Alternative approach for Photoshop and Elements users > Adobe Elements users should proceed to the next step and create a gradient directly in the Layer Mask.

Working With Shadows In Photoshop - Advanced Shadow Techniques

Use a levels adjustment layer to balance the background tonality.

Step 3
From the base of the layers palette select a ‘Levels’ adjustment layer. The active selection will create a layer mask for the adjustment layer. Move the central ‘Gamma’ slider and/or highlight slider to the left to brighten the background so that both sides of the background are of a similar tone. Be careful not to loose the shadows in this process. Select ‘OK’ when a satisfactory balance has been achieved.

Working With Shadows In Photoshop - Advanced Shadow Techniques

Working With Shadows In Photoshop - Advanced Shadow Techniques

Select the subject without its shadow. A graphics tablet can help to make light work of this task.

Step 4
Use the painting tools in ‘Quick Mask Mode’ to make a selection of the flower on the background layer (Elements users should use the ‘Selection Brush Tool’ and select the ‘Mask’ mode in the options bar). Remember to feather the selection appropriately or apply a small amount of ‘Gaussian Blur’ to the mask. Click on the layer mask icon in the layers palette to apply a layer mask to the background copy layer (if using Elements the selection can be used to delete the background on this layer).

Note: A graphics tablet can be used to make light work of tricky selections such as the one performed in this demonstration tutorial.

Working With Shadows In Photoshop - Advanced Shadow Techniques

Drag the background copy layer to a position above the levels adjustment layer.

Step 5
Drag the background copy layer to a position above the levels adjustment layer. This will ensure the adjustment layer created in the previous step does not affect your subject.

Working With Shadows In Photoshop - Advanced Shadow Techniques

Use a ‘Threshold’ adjustment layer to render all pixels below the flower black.

Step 6
From the ‘Create new fill or adjustment layer’ menu in the layers palette select ‘Threshold’. This threshold adjustment layer will help in the process of isolating the subtle shadows and enable us to drop the remainder of the background to pure white (255). The first step is to temporarily render all of the pixels below the flower on the top layer black. This is achieved by dragging the slider all the way to the right – a threshold level of 255. Select ‘OK’ to exit the threshold dialog box.

Note: Check the positioning of the layers in the layers palette if your own result does not match that achieved in the tutorial.

Working With Shadows In Photoshop - Advanced Shadow Techniques

Move the Gamma and Highlight sliders to render the grey tones of the background paper white.

Step 7
Move the ‘Gamma’ and ‘Highlight’ sliders to render the grey tones of the background paper white. The shadows should now appear clearly defined. Unless the background is blemish free and very evenly lit not all of the background will be rendered white by this step. Have no fear the whitewash step follows.

Working With Shadows In Photoshop - Advanced Shadow Techniques

Paint out any remaining dark areas that are not part of the subjects shadow.

Step 8
Select the ‘Paintbrush’ in the ‘Tools Palette’ and click on the ‘Switch Foreground and Background Colors’ icon so that White is now the foreground color. Now paint out anything that is not a shadow.

Note: If the thought of painting directly onto the background layer is not something you are comfortable with then either duplicate the background layer again or take comfort in the fact that you already have another ‘unadjusted layer on top’ as your insurance policy.

Working With Shadows In Photoshop - Advanced Shadow Techniques

Working With Shadows In Photoshop - Advanced Shadow Techniques

Import a new background.

Step 9
The threshold layer has now served its purpose and its visibility can be switched off, or the layer deleted by dragging it to the trash icon in the layers palette. When the threshold is removed from the equation the background will appear white and the subtlety of the shadows will reappear. The coast is now clear for the introduction of the new background. Open the new background file and drag its thumbnail from the layers palette into the window of your work-in-progress file. Hold down the Shift key as you let go of the file to centre it in the host canvas. The new background will appear above the modified background layer for the moment.

Working With Shadows In Photoshop - Advanced Shadow Techniques

Link the background layer and its associated adjustment layers to create a ‘clipping’ group.

Step 10
The next step involves moving the old background to a position above the new background. Start by linking the old background layer with its associated adjustment layers (click on the boxes next to the eye icons on each of the layers). Then go to the Layer menu and select ‘Create Clipping Mask From Linked’ command (‘Group Linked’ in Adobe Elements). This action will ensure the new background remains unaffected when the adjustment layers are moved up in the layers palette in the next step.

Working With Shadows In Photoshop - Advanced Shadow Techniques

Rename the background layer and move to a position above the imported background.

Step 11
Double-click the background layer to change its name. When the layer no longer carries the name ‘background’ it can be moved up the layers stack by clicking and dragging it to a position the new background. The linked layers should accompany it on its travels. The new background will momentarily be replaced with the old white background once again.

Working With Shadows In Photoshop - Advanced Shadow Techniques

Working With Shadows In Photoshop - Advanced Shadow Techniques

Adjust the blend modes for the old background layer and the adjustment layers.

Step 12
The final step merges or blends the subtle shadows into their new home. Select the old background layer and change its blend mode to Multiply (click on the blend mode menu in the layers palette next to the opacity control). Set the adjustment layers to Luminosity mode if you need to reduce any color that has been introduced from the old background. Add a further Hue/Adjustment layer to this clipping group if additional desaturation is required.

Working With Shadows In Photoshop - Advanced Shadow Techniques

Fade the background and/or create a subtle vignette using adjustment layers and the gradient tool to complete the project.

Step 13
Finishing touches to this project could include the addition of a very subtle vignette, lightening the background as it fades into the distance and the usual sharpening process prior to printing. If an additional adjustment layer gets accidentally grouped with the Clipping group go to the layer menu and select ‘Release Clipping Mask’ command.

Working With Shadows In Photoshop - Advanced Shadow Techniques

Subtle Shadows – courtesy of the shadow catcher technique.

This technique provides those photographers burdened with a meticulous eye a useful way of retaining and transplanting the subtle and complex shadows from the original image to create sophisticated and professional montages.

Photoshop Masking & Montage Tutorial — Using Masks To Improve Landscape Images

Tutorial Work Files
You can download the images needed to work along with this tutorial. for instructions on how to access them. The images are high resolution and will make it easier to reproduce the exact effects from this tutorial.

Photoshop Masking & Montage Tutorial — Advanced Techniques For Improving Landscape Images

Photoshop Masking & Montage Tutorial — Advanced Techniques For Improving Landscape Images

Original Venice image by Craig Shell (sky by Mark Galer)

Drama in Venice
Venetian classical painters had a passion for moody and tempestuous skies (just Google the Tempest by Giorgione to see one such example). I now find it hard to look at an image of Venice with a featureless sky. The sky is an essential ingredient of any memorable landscape image. Unfortunately it is not something the photographer can control unless we have limitless time and patience. The commercial photographer is often required to deliver the goods on a day that suits the client rather than the photographer and weather forecast.

In these instances it is worth building a personal stock library of impressive skies that can be utilized to turn ordinary images with bland skies into impressive ones. The digital compact set to a low ISO is ideal for capturing these fleeting moments. The most useful skies to collect are the ones that include detail close to the horizon line, i.e. captured without interference from busy urban skylines, such as can be found at the beach or in the desert.

A stock library of skies is included on the DVD of the new Photoshop CS3 Essential Skillsbook (published by Focal Press) to help you start, or add to, your own collection. In this project we explore how a sky can be adapted to fit the landscape so the montage is not immediately obvious.

Photoshop Masking & Montage Tutorial — Advanced Techniques For Improving Landscape Images

Step 1
Select the Magic Wand Tool from the Tools palette and set the tolerance to 20 in the Options bar. Select the Add to Selection icon in the Options bar or hold down the Shift key as you click multiple times to select all of the sky. Zoom in to 100% or ‘Actual Pixels’ and select Quick Mask mode from the Tools palette.

Use the Polygonal Lasso Tool to select the tops of the buildings that were not included in the mask because the Magic Wand may have become over zealous. Fill this selection with black (if Black is the foreground color in the Tools palette you may use the keyboard shortcut Alt/Option+backspace/delete). Exit Quick mask Mode when this work is finished (keyboard shortcut is to press the letter Q).

Photoshop Masking & Montage Tutorial — Advanced Techniques For Improving Landscape Images

Step 2
Open the Sky image used in this project and from the Select menu choose All. From the Edit menu choose Copy. Return to the Venice image and from the Edit menu choose Paste Into. Don’t be alarmed at how bad it looks at the moment, we have several more steps to go before things start to look OK. For the moment we must be content that the sky was captured at a similar time of day to the Venice image and the direction of light is also similar. From the Select menu choose Deselect.

Photoshop Masking & Montage Tutorial — Advanced Techniques For Improving Landscape Images

Step 3
Make sure the Image rather than the mask is the active component of the layer and then choose Free Transform from the Edit menu (Ctrl/Command+T). Click and drag inside the Transform bounding box to raise the sky into position. Click and drag on the top-center handle to further enhance the location and shape of the sky to fit the host image. Press the Enter/Return key to commit the transformation.

Photoshop Masking & Montage Tutorial — Advanced Techniques For Improving Landscape Images

Step 4
Click on the layer mask to make it active and then go to Filter > Blur > Gaussian Blur. Choose a 1-pixel Radius in the Gaussian Blur dialog box and select OK. Go to Filter > Other > Maximum and enter a Radius of 2-pixels. This should be sufficient to remove any light halo from around the edges of the buildings. Select OK to apply these changes to the mask.

Photoshop Masking & Montage Tutorial — Advanced Techniques For Improving Landscape Images

Step 5
Hold down the Alt/Option key and select a Curves adjustment layer from the Create new fill or adjustment layer icon in the Layers palette. In the New Layer dialog box check the Use Previous Layer to Create Clipping Mask option. Select OK to open the Curves dialog box. Create a curve that renders both the highlights and midtones of the sky very bright so that they match the tones of the distant buildings. Skies that have been captured in less humid conditions will always require this adjustment if they are look at home in a location where there is reduced contrast together with lighter tones in the distant subject matter. Select OK to apply the changes.

Photoshop Masking & Montage Tutorial — Advanced Techniques For Improving Landscape Images

Step 6
Select the Gradient Tool from the Tools palette. In the Options bar choose the Black, White and Linear gradient options and an Opacity setting of 100%. Click and drag a gradient from the top of the image to a position just above the horizon line. Hold down the Shift key to constrain the gradient. This will give the sky depth and ensure the sky retains it drama above the buildings in the foreground.

Photoshop Masking & Montage Tutorial — Advanced Techniques For Improving Landscape Images

Step 7
Create a second Curves adjustment layer by holding down the Alt/Option key and adding this layer to the Clipping mask. The purpose of this second adjustment layer is to increase the intensity of the light on the left side of the image. This will help establish the light source that is bathing the buildings on the right side of the image in a warm afternoon glow and help establish a realistic effect.

Raise the overall brightness using the RGB channel and increase the warmth using the individual Red and Blue channels. Observe the effect above the foreground buildings on the left side of the image. When you have achieved a warm glow select OK.

Photoshop Masking & Montage Tutorial — Advanced Techniques For Improving Landscape Images

Step 8
Fill the layer mask with Black (Edit > Fill > Black). Select the Gradient Tool from the Tools palette. Select the Black, White and Radial options. Set the mode to Screen and select the Reverse checkbox in the Options bar. Drag a short gradient from behind the buildings on the left side of the image to the top-center of the image.

Photoshop Masking & Montage Tutorial — Advanced Techniques For Improving Landscape Images

Photoshop Masking & Montage Tutorial — Advanced Techniques For Improving Landscape Images

Step 9
Select the top layer in the layers palette and then stamp the visible layers to a new layer (Select > Select all, Edit > Copy Merged and Edit > Paste). Go to Filter > Distort > Lens Correction. Go to the Vignette section of the dialog box and lower the Amount slider to -100. Raise the Midpoint slider slightly so that the vignette does not encroach too heavily on the buildings on the extreme right-hand side of the image.

Select OK to apply these changes. Go to Filter > Sharpen > Smart Sharpen. Be generous with the amount and keep the radius small (under 1 pixel). The project is now complete and the scene carries all the mood of an old Venetian painting courtesy of a dramatic sky.