
Have you ever wished you could have perfect skin? Have you ever wished you could get rid of all the acne and pimples and blemishes and scars on your face? Now you can!
Well, at least in your photographs. ![]()
Do you have a near-perfect portrait of yourself, that is embellished by a pimple? Don’t you just hate when that happens? In this tutorial, I will show you how to get rid of all the unflattering marks on your face using Adobe Photoshop mostly by just using two tools. Yes, just two! You will be surprised at how easy it is to do it! So, let’s get started.
Step 1:
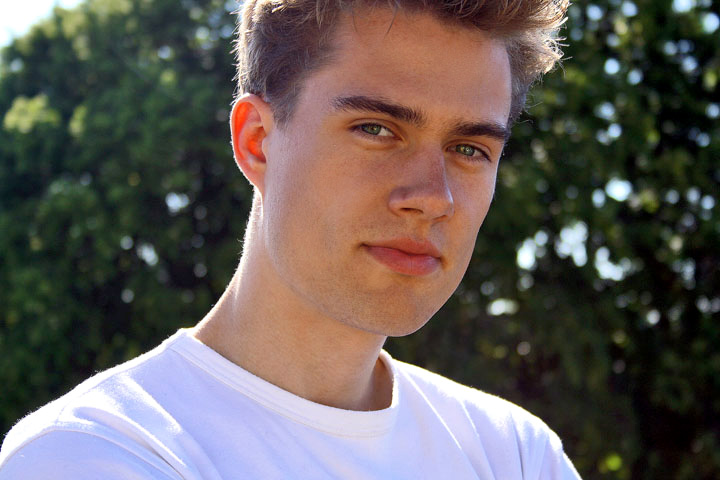
I’ll be using this photograph below as an example. You, you can dig up a photograph of yourself to try. Come on now, don’t be shy. Bring the photograph in to Photoshop, preferably using the biggest resolution version of that photograph that you have.

At this point, I would colour-correct the photograph first before continuing with the editing. Not sure how to? Feel free to read my tutorial on how to colour-correct your photos first. Don’t worry, we’ll wait. ![]()
Step 2:
Here’s the magic tool that you’ve been waiting for : Healing Brush Tool.

I’ve heard of designers and photo editors who have never even heard of this amazing tool, and I hope to help put that to an end with this tutorial (and after that, take over the world!). Using this tool is pretty simple, but first let’s set the correct options.

Once you’ve clicked on the Healing Brush Tool icon, you will be presented with a toolbar of options. Click on the arrow button beside the Brush option.
Set the diameter of the brush (ie. the brush size) to something small, depending on your image resolution. A good way to base this size upon is to see the diameter of the most visible blemish in your picture. Set the diameter to something slightly bigger than that. (But this really depends on the photograph and if there are a mess of blemishes together.)
For this example, I’ve used 19 pixels as the brush size, but I change this brush size dynamically while using the tool on different parts of the face. Experiment! See what works for you.
Now set the brush hardness to about 15%. This will give the brush a feathered edge, which will help blend the blemishes with the rest of the skin.
You can ignore the rest of the options for this tutorial.
Step 3:
A tool can do wonders, but you have to properly use it to get great results. Here’s how you properly use the Healing Brush.
- Zoom in to your picture. I zoom in and zoom out often to see the overall progress. Remember the proverbial “You can’t see the whole forest if you just look at one tree”? It’s the same concept here, only more literal. Heh.
Once you’re zoomed in (200% is usually enough, but again it depends on the resolution of the image you’re working with), press Alt (Option for Mac users) and left-click on a part of the face near to the blemish with nice skin. What this does, is to provide a source for Photoshop to correct the blemish you use the Healing Brush Tool on.

- Alright, the trick is to just use the brush once on the blemish. Single clicking works better than holding the left-click and swiping across the blemish. So, do this : Alt + left-click on a nice part of the skin around the blemish, and then single left-click on the blemish. Repeat on other blemishes.
Remember, do not swipe the brush around while left-clicking! The results will rarely turn out good. Single left-clicking for each blemish will give you the best results.


- Now continue doing that for all the visible blemishes, keeping in mind to keep zooming out to see the overall progress. Also, remember to change your brush size as you see fit. Don’t use a huge brush on a small pimple, although sometimes using a smaller brush on a huge blemish works quite well too.
If at some points, the Healing Brush Tool gives you a totally messed up result (like for example, a solid colour appears that’s not the colour you sampled or what your target is), undo and try again. If it still gives you the wrong result, ignore that for now. We’ll get to that in the next step.
Quick tip:
With the Healing Brush Tool in use (or any other brushes, really), you can use the ]button to increase the brush size and [ button to decrease it.
Step 4:
Here’s how the guy’s looking once I’m done. Looking quite good, no? This is just with using the Healing Brush Tool. If you click to enlarge the image, you might notice some parts are still not acceptable. Or maybe you might not notice, but I’m a borderline perfectionist. ![]()
You might also notice that if you use the Healing Brush Tool, and you want to clean up something that’s in a part of the photo that’s of high contrast, the tool might not work properly. Like for instance, a pimple that’s above the guy’s left eyebrow (that is, from our view, the right eyebrow). If you try to heal that using a 19 pixel brush, it will not turn out correctly. You could use a small brush, but we’ll use something else.
Remember, I mentioned two tools? The second one is the Clone Stamp Tool. It’s right below the Healing Brush Tool in the toolbar. The way to use this tool is exactly the same as using the Healing Brush tool. I’m going to use this tool to clean up the image a bit more.

Step 5: So here’s an example of what I used the Clone Stamp Tool for.

Then I noticed a bit more stuff I didn’t see previously. A bit more Healing and Cloning later, and here’s the end product…

Honestly, as I’ve mentioned somewhere else before, the trick is to know when to stop. You can continue if you like, but I am happy with the end product here.
But. Just for fun, I’m going to teach you another step I use.
Step 6:
Use any selection tool you’re comfortable with. Me, I enjoy playing around with the Magic Wand Tool once in a while. Set the options to the settings in the image below.
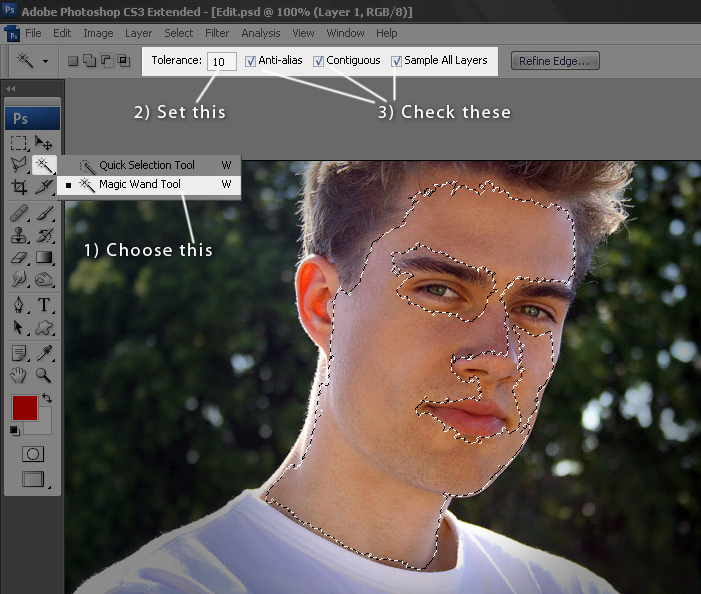
Click on the Magic Wand Tool and click on any part of the guy’s (or in your case, your own) face. Press Shift and click again until you get most of the face selected.
The Tolerance setting can be higher if you like. Setting it higher tells the Magic Wand Tool to select more of the pixels that looks like the ones you’ve chosen.
The purpose of this is not to get an exact selection. Just to get a somewhat of a face-mask-like selection of the face. Try not to get the hair, eyebrows, eyes, lips and nostrils selected. Don’t worry if you select lesser than the whole face ’cause it’s not necessary to get everything, but do not select the background or the shirt. If you do get some in, using the Magic Wand tool, press Alt instead of Shift to do some deselecting. Or use the history list (or Control Z) to undo.
Okay, next.
Step 7:
Right-click and choose Layer via Copy. This will create a new layer with just the selected skin.
Right-click that layer and choose Duplicate Layer…. You can ignore the options that follows and just click the OK button. That will create an exact copy of the layer you just created.
Click on the 1st layer “eye” icon to hide the layer for a bit. We will use this later.

- Click on Filter > Blur > Gaussian Blur. Depending on your picture resolution, experiment the Radius amount to one that will give your layer a nice, relatively flat, but slightly gradiented, consistent colour. For this image, I use 8.5 pixels for the Radiusamount.
It’s okay if your Radius amount is drastically different than mine. Previously, I’ve set it to about 30+ pixels for a 6 MP photograph. Once you’re happy with the blur, click the OK button. Try to aim for something like this:

- Now, press the Control button and click on the layer you hid just now. It will grab the selection of the layer and that’s all you need. Now click on the Add Layer Maskbutton. If you had tried my cloning tutorial, you might remember where that is? If you don’t recall, here it is:


Step 8:
Alright, this might seem weird, but we’re going to add some noise to the layer we have just blurred. This is to allow the blurred layer to blend better with the original image later on.
Click on Filter > Noise > Add Noise…
Under Distribution, check Uniform (as opposed to Gaussian, which in my opinion gives too strong of a noise distribution) and check Monochromatic, and set theAmount according to your original image noise level.
The image I’m using is quite noisy, and a bit of experimenting shows that 1.5% noise gives a similar noise look to the original image, so that’s what I’m sticking with. Feel free to adjust the amount as you see fit. Skipping this entire Step 8 is okay too, if your original photograph is not visibly noisy.
Click the OK button and let’s continue.
Step 10:
Now, click on the Brush tool, and choose a nice feathered brush size. This brush size will, again, depend on the image you have chosen. For the image I’m working with, I find that a size 27 feathered brush works quite well. Once again, feel free to use different sized brushes while you’re working; you don’t have to just stick to one size.

Then, set the Opacity and Flow of the brush to 50%. Again, feel free to lessen or increase both settings. Sometimes, I leave both at 100%.
Step 11:
So you’ve got your feathered brush selected, now click on the Layer Mask and make sure your Foreground and Background colours are set to Black and White.

Now brush against the edges of the “face mask” that you’ve created until the edges of the layer look like they fit in to the rest of the face. Pay extra attention on the edges of the eyebrows, hair and such. Once you’re done, lower down the opacity of the layer to about 30%.

The above is how your final image should look like. I made the opacity of the blurred layer to 30% only because I like to keep the final image as realistic as possible. You can increase the layer opacity to as much as you like if you prefer the “obviously-fake” look (like a certain celebrity-blogger? :P). Me, I like to fool people to the point of almost disbelief, but with a hint of “Hmmm, maybe it is real!” Heh.
Step 12:
That’s it! That’s all there is to it. Now you can look perfect in your photographs all the time! Hehe. Just be certain to let your readers know that your images are highly Photoshopped and tell them to come here to find out how to do it themselves! We don’t want you getting accused of misrepresentation, now, do we? No, no, we don’t.
The last step can also be used to reduce noise from your images, for example if you’re printing a banner, using photos taken at a high ISO. And the Healing and Cloning tools can also be used to correct any other unwanted marks from your images, like say, dust on a scanned photo.
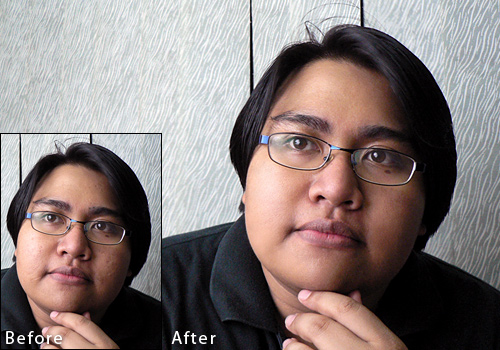
But editing blemishes away from your photographs is the most fun thing to do, of course. ![]() If you try this tutorial, show us your before and after pictures, yah? Oh come onnnnn, be a sport! Heh. Here, I’ll start things off with showing my digitally touched up images.
If you try this tutorial, show us your before and after pictures, yah? Oh come onnnnn, be a sport! Heh. Here, I’ll start things off with showing my digitally touched up images. ![]()

Happy Photoshopping!
This entry was published by mr malique’s co-author, Zul.
No comments:
Post a Comment